7 Steps On How To Take Professional Headshots At Home With Your Smartphone

Updated October 2025
How To Take Professional Headshots With a Smart Phone At Home | The Ultimate Step-by-step Guide
Yes, it is possible to take a headshot by yourself with an iPhone or most smartphones at home! In this article, I will teach you how to take a DIY headshot that yields pro-like results.
According to research, the best headshots should display attributes like likability, competence, and leadership.
You don't need the latest phone to achieve great results. The key is to have an understanding of how to use your smartphone camera and what lighting and background elements to look for.
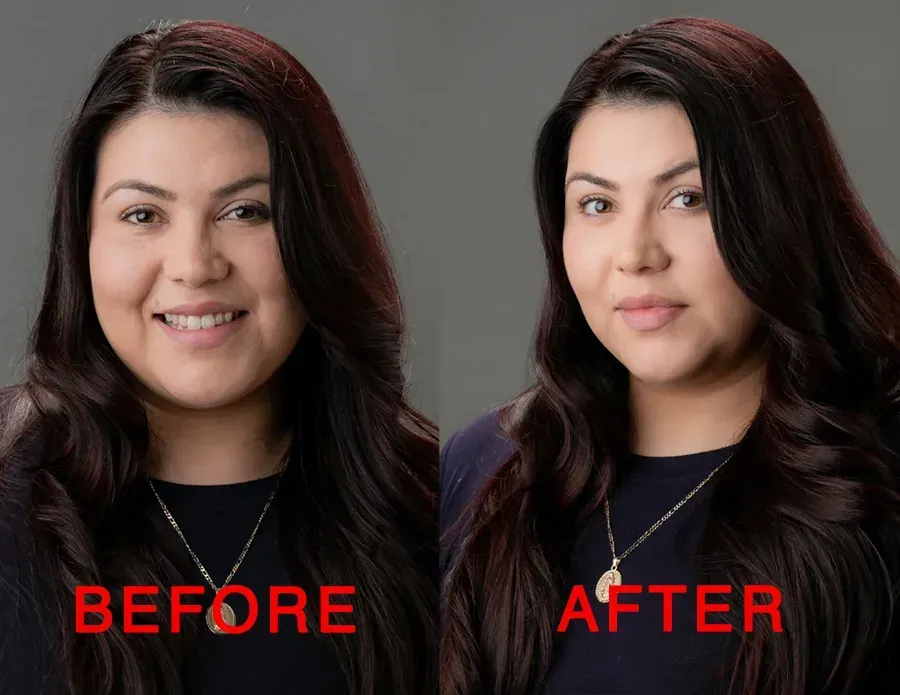
By applying the strategies outlined in this article, you can make your DIY headshot appear professional. I always recommend hiring a professional photographer for a headshot photo session. If you're tight on time or budget, these helpful tips will come in handy.
By the end of this article, you will walk away with my most useful tips that will help you get professional-looking headshots taken at your home or office with a smartphone.

DIY Quick Start Headshot Tips
This in-depth article gets into just about every aspect of capturing your DIY headshot. However, if you just want the cliff notes version so you can have a pic in the next 15 min. Here are the key elements listed in the order of importance. I also have a video in case you prefer to watch my tips.
Elements to consider
- Background: Find an uncluttered background.
- Light: Stand in the shade and face the light.
- Outfit: Wear clothes that look professional for your industry.
- Pose: Stand up straight with your weight on one leg/hip, and look straight at the camera.
No selfies. Have a friend take your photo, or use a tripod and remote trigger. Also, take at least 20-50 images with varied smiles and expressions.
Step 1. How To Setup Camera Settings On Smartphone
Let’s get technical now. You don't have to use an iPhone this is just my preference. Any brand smartphone should work. As long as your phone is within 3-4 years old it should have an excellent camera. This goes for iPhones and high-end Android smartphones including Google Pixel and Samsung Galaxy phones. Some of the instructions below are specifically for an iPhone. I will mark iPhones or all phones by each bullet point.
- Go to phone settings, and under camera choose the proper formats. Make sure the camera setting is on Most Compatible not High Efficiency (iPhone)
- Always use the main camera lens of your phone which is on the back of your phone (all smartphones)
- Get familiar with the bursts mode or the self-timer
Basic iPhone Setup Tips
Settings/Camera/Formats/Most Compatible

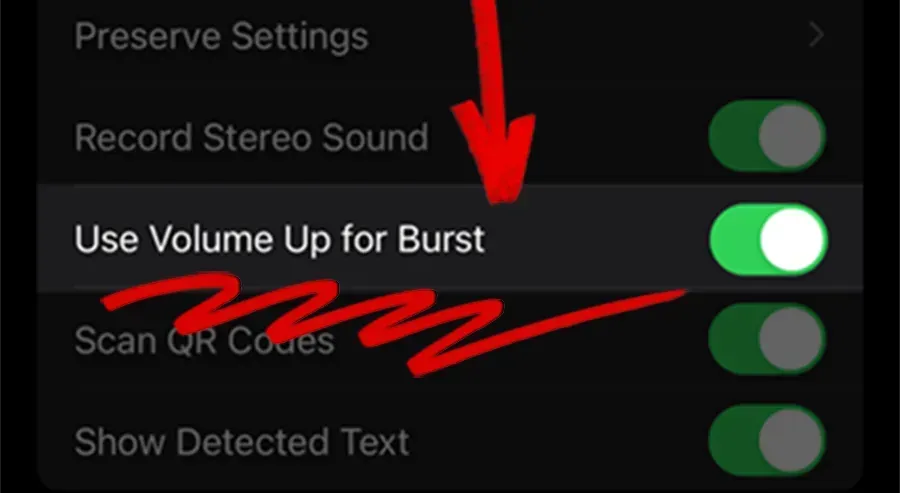
Toggle on burst mode
- Once activated, photo burst mode can be used on your iPhone by holding the volume up button.
- After shooting a burst, you can go into your Photos app and review one photo at a time.
- Burst mode is a little tricky at first, so be sure to have whoever takes your photo practice a few times. I like to say "123 action" when photographing a headshot in burst mode.
Pro tip: Burst mode is best when you have somebody taking your photo. If you're working alone, I suggest using the self-timer or using a tripod with a remote trigger paired with your phone.
Settings/Camera/Use Volume Up For Burst
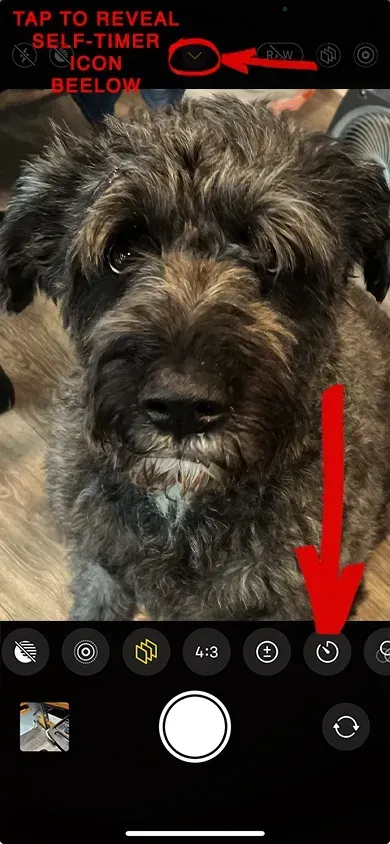
Where Is The Self-Timer
The hardest part about using the self-timer on an iPhone is finding the setting. In your photo app click on the white arrow in the center top of the screen. It will turn yellow and reveal a new menu at the bottom of the screen. You might need to scroll to the left to find the self-timer.
Pro tip: Self-timer mode is my go-to setting when working alone, and don't have a remote trigger to take the photos.
More iPhone Camera App Tips
- Leave on regular setting, do not turn on portrait mode. (all smartphones)
- Disable any flash on the camera/phone. (all smartphones)
- Always use the main camera lens of your phone, which is on the back of your phone (all smartphones)

Pro Tip: Use a Tripod and remote. Where to purchase Amazon link. #ANchor link how to shoot section
Step 2. Prepare Yourself For Your Photo Session
HOW TO STYLE YOUR HAIR
Women should organize their hair
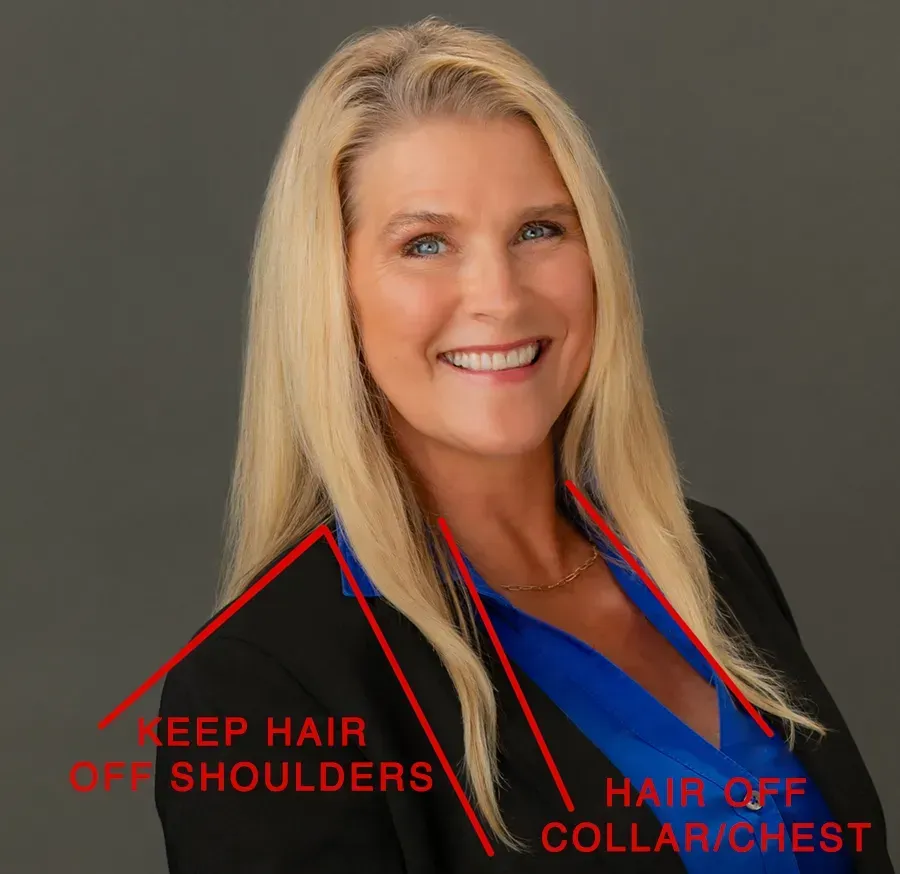
If your hair is shoulder length or longer. Think of your hair in 3 pieces. The first two pieces go forward over each shoulder and the third piece goes behind you down your back. Be sure to twirl or pull together the hair in the front so it looks orderly.
I most often see hair get stuck in collars and lapels of jackets. So be sure to keep the hair out of your collar and off your neck and chest.
Watch Under Your Chin
Another spot to look out for is under the chin. Women with a bob-style look. Hair just below the jawline will oftentimes have pieces of hair curled under the chin looking like a beard.
Manage Frizzy Hair
Stray hairs can be removed in post-production but it's always better to try to tame frizzy baby hairs before your headshot. My secret trick. Apply a tiny amount of hand lotion rubbed between your palms. Wipe it down your hair starting from your part. Focus on the top of your head where flyaways are most obvious. A light mist of water from a spray bottle will also do wonders. Be careful not to over-wet your hair.
Use Hair To Frame Your Face
I don't like to see hair over one eye for a professional-looking business photo. But it's ok to have hair close to your eyes if you want to make your face look narrower. You can also use hair to hide your ears. Make sure to avoid having ear tips popping out.
Men with short hair
Make sure your hair has been recently trimmed. However, It's a good idea to wait 5-7 days after a barber visit to take headshots.

Thin Hair Or High Hairline
Be extra aware of the light on you. Avoid overhead lights like recessed ceiling lights over you as they will make your hair look thinner.
If you're bald or clean-shaven avoid headshots with stubble or a 5 o'clock shadow on your head. Also smart to be aware of shine or glare off your scalp. I'll talk about how to avoid that below in the lighting section of this article.
If You Wear Glasses
Be aware of how your hair interacts with your glasses above your ears. Make sure your hair is tucked under the earpieces of your glasses.
Skin Prep Tips
My favorite common sense skin care tips are to hydrate. Drink lots of water 3-5 days before your headshot for glowing skin.
Avoid alcohol the night before, because it dehydrates you. Get lots of sleep. Rest has a direct effect on how you look.
Wear makeup if your skin is naturally oily or shiny. If your complexion is uneven or ruddy makeup will help even out any blotches or redness.
Acne usually manifests as redness or swelling. DO NOT pick pimples. Instead, use a cold compress or ice to reduce swelling. Next start by washing your face and blotting it dry. Do not rub your face with a towel as it will irritate your skin and cause redness and swelling. Use an oil-free moisturizer and carefully apply concealer to even out your skin.
Scars are one aspect of skin that needs to be judged on a case-by-case basis. The best way to remove scars is a combination of makeup and photo retouching. Personally, I like to keep permanent scars intact but erase them about 40% to 60% based on their size, color, and location on the face.
Eye Bags/Puffiness are often mentioned by my clients. The best ways to remove under-eye bags is to reduce sodium in your diet for about a week before your photos. Get more sleep. Avoid allergens. Medications like hemorrhoid crème or under-eye products that contain sodium silicate. However,
my favorite
solution is to use a cold mask from Amazon.

Makeup
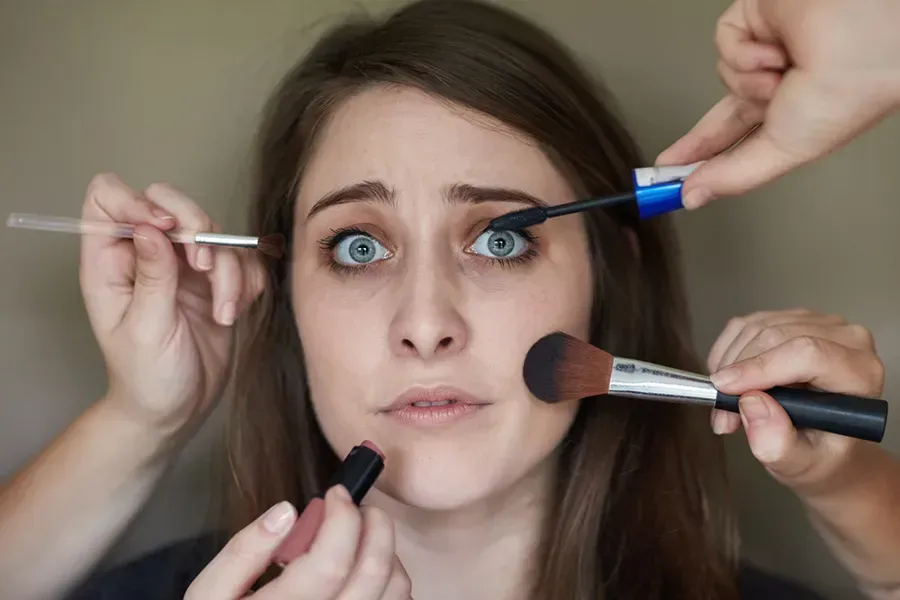
It's a good idea to keep makeup natural. Especially if you don't wear makeup often. I recommend keeping it to a minimum.
Unsure How Much Makeup?
If you're not sure how much makeup to wear for a headshot you are not alone. I oftentimes work with women who use a makeup artist (MUA) and end up wearing more makeup than they are used to. Many women have said they don't feel comfortable with their makeup and their photos as a result.
If you wear makeup every day and want to do something special. Consider hiring a professional MUA. A good MUA will be able to evaluate your face to accentuate or diminish features for your best look.
Many of my clients in the past have opted to purchase some skin products and have their makeup done at a local mall kiosk like MAC. However, be aware that this can be a hit-or-miss situation since you don't know who you will be working with.
Jewelry
The best headshots put your personality front and center. Your features and expression should be the star of the show. I recommend a Less is more approach when it comes to jewelry. Subtle jewelry is the best. Avoid any jewelry that is distracting.
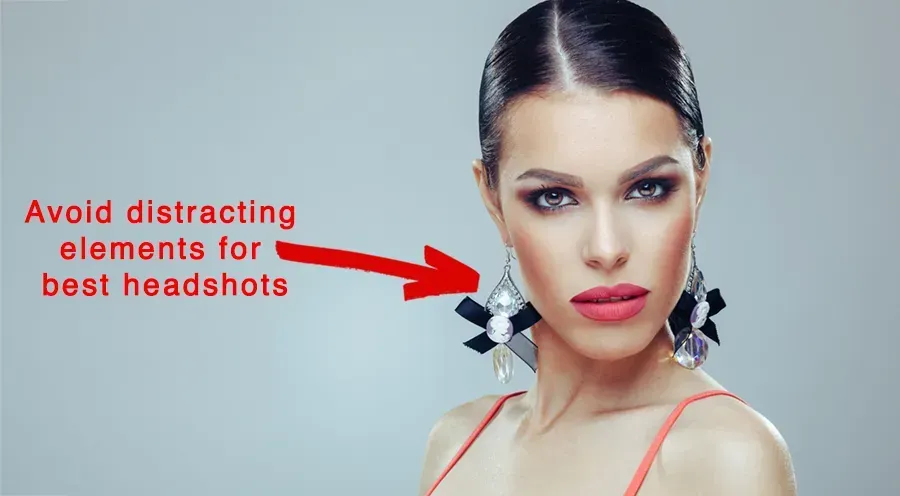
Stay away from Hoop or dangling earrings. Choker-style necklaces that ride high on the neckline. Medalions or large pendants. Brightly colored jewelry such as neons.
Eyeglasses
The biggest problem with glasses is reflections that block the camera's view of your eyes. Watch out for reflections when setting up your shot.
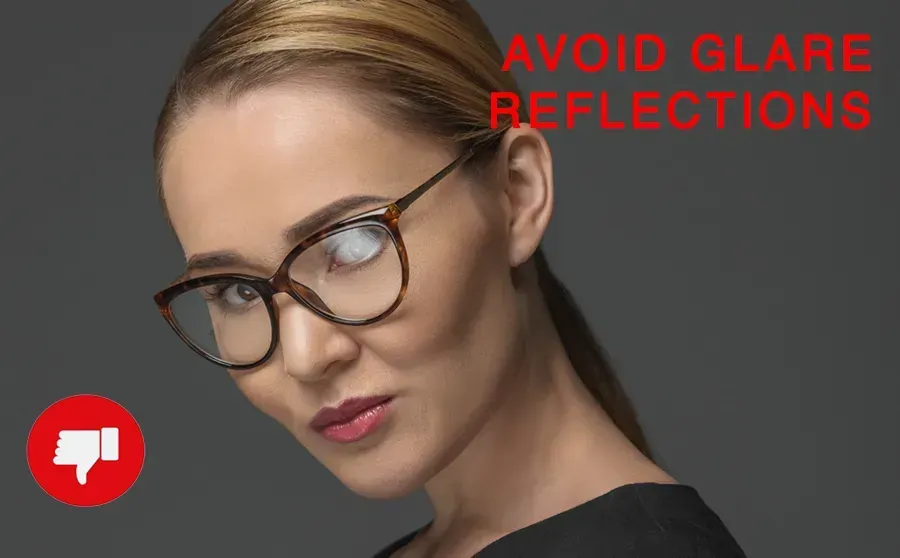
How To Avoid Reflections
Take off your glasses. My clients usually appreciate having more choices when picking their headshot photos. Simply removing your glasses for a few shots will give you some additional options.
Remove the lenses. It's not often I have had clients remove their lenses for a headshot. But it's an option to get rid of glare and reflection. First Make sure you can remove the lenses without damaging your frames.
Tilt Glasses Down
Lift the earpieces up a little to tilt your lenses forward reducing glare. This starts to look weird quickly so be aware. Just a small tilt will usually work. You can also tilt your face or chin down to change the angle more and reduce glare.
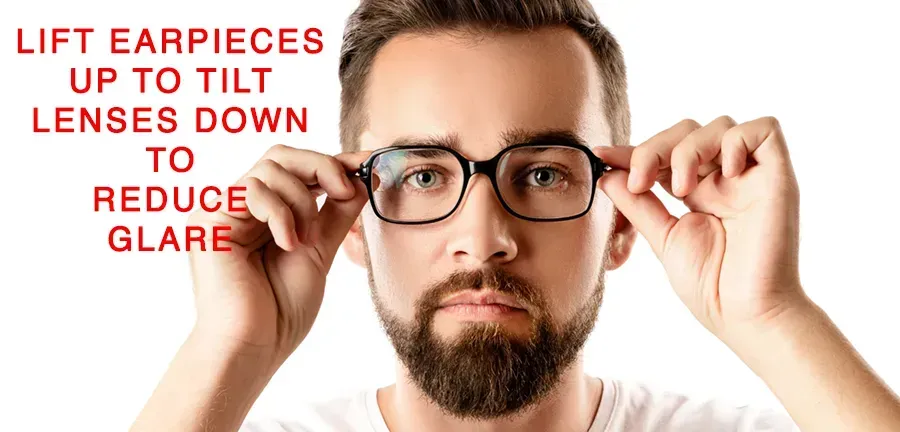
Don't Face The Light
Move your light from the front to the side. If you can't move the light, such as a window. Then turn to the side and move the camera. I'll discuss more about this in the lighting section below.
Facial Hair
Clean and well-defined is recommended. Avoid messy unkept facial hair. Do a once-over on a mustache or beard to trim any unruly hairs.
If you want to get rid of your facial hair shave 24 hours before you want to be photographed so you don't have any visible redness or irritation. Use shaving crème with aloe to soften your skin.
Nose Hair. Be sure to check it. Just make sure it's in your nose and not hanging out of your nostrils.

Nail Your Look
Below are some tips and techniques for upping your performance in front of your camera.
Finding Your Angles
Evaluate both sides
of your face. Chin up and down
Smile showing your
teeth
Try fake laughing to create an authentic-looking smile
Recruit someone to make you laugh
Practice soft smiles with focused eyes
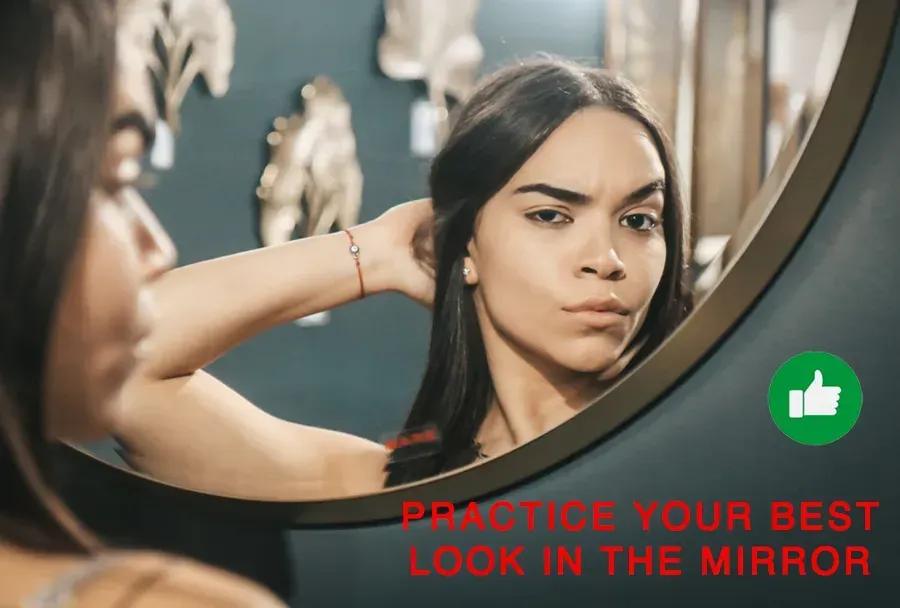
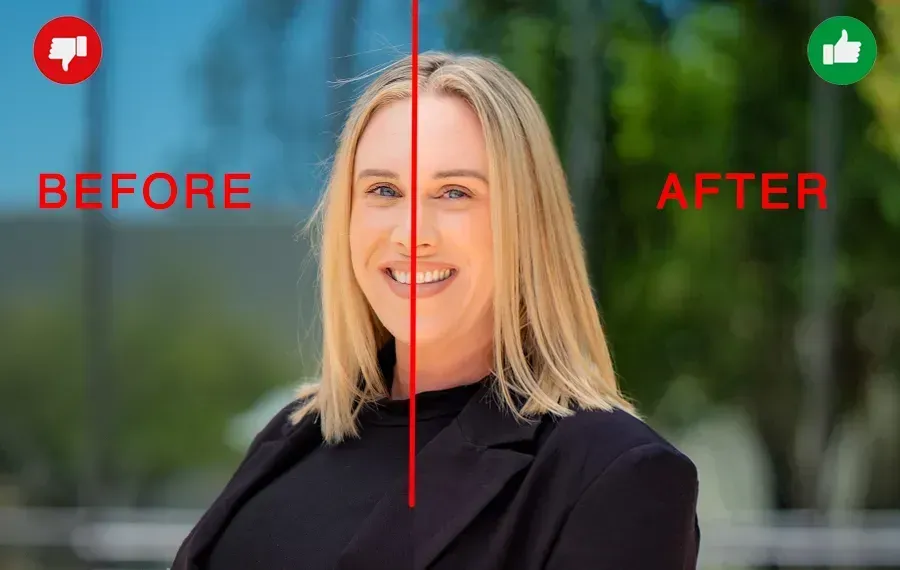
Practice Smiling In A Mirror
The number one question I get from headshot clients is how do I pose? Followed by What do I do with my hands, and should I smile? I must say, if taking your own headshots is starting to feel overwhelming let a pro help you. They will guide you with facial expressions, and posing, and give you advice on what to wear.
But for now, try this at home on your own. Before you start to take photos, stand in front of a mirror and practice smiling and posing. At first, it might feel awkward. The goal is to figure out what expressions and angles are best for you. If you're able to do that your photos will look more professional. Remember practice makes perfect.
How Big Should I smile?
I like to see a smile in a headshot. I believe human beings are hardwired to be open to somebody smiling. Besides, not smiling can make you look like a serial killer. If you don't like your teeth or smile, try a soft smile.

What Expressions Are Best For Headshots
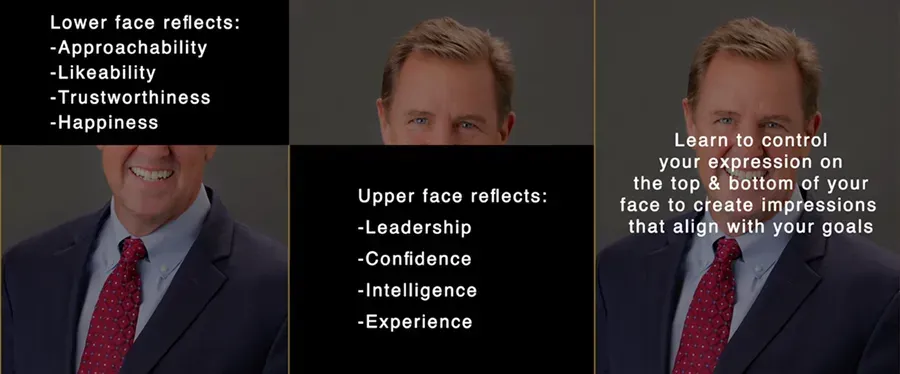
Think about your face in 2 parts. The top & bottom. In regards to peoples perceptions of you. The top of your face is connected to qualities such as Leadership, Confidence, and Intelligence.
The lower face is more correlated with important attributes like Approachability, Trustworthiness, and Happiness.
Practice your expressions with this knowledge to discover your perfect look so you can create a headshot that sends then right message every time.
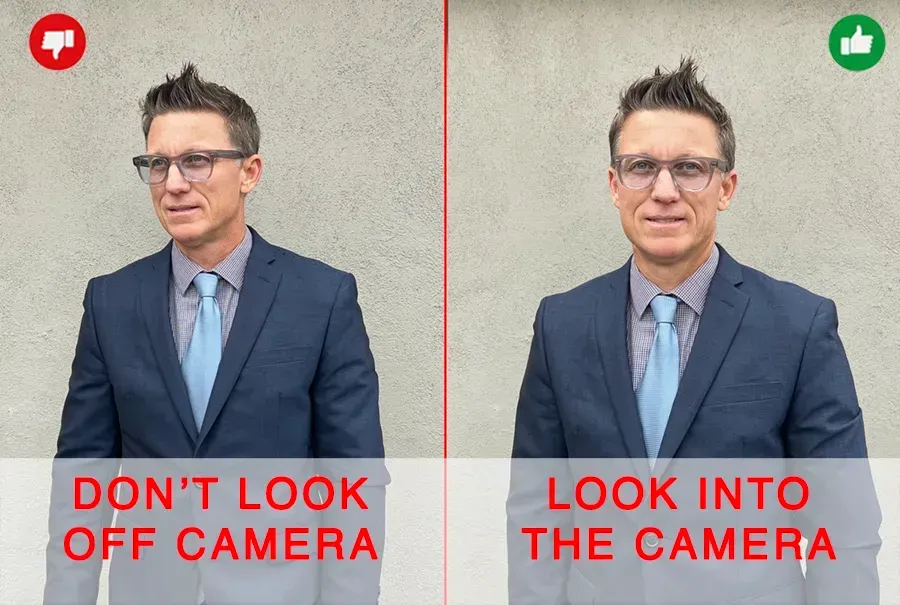
Look At The Camera
Nearly all great headshots for business purposes have a directness to them. That means you need to look at the camera. Even better look through the camera like your melting it with lasers coming out of your eyes from a 60s era sci-fi movie. Directness shows confidence and leadership. Two qualities that are important in every profession.
Never look away, or off camera for business photos, as it implies uneasiness. However, looking off camera is OK for different types of photography, such as social media, or branding photography when the goal is authenticity. Looking away from the camera can feel like an authentic snapshot of you in the moment. When it comes to Headshots and business. Keep your eyes on the lens for the best results.
How To Pose Like A Model
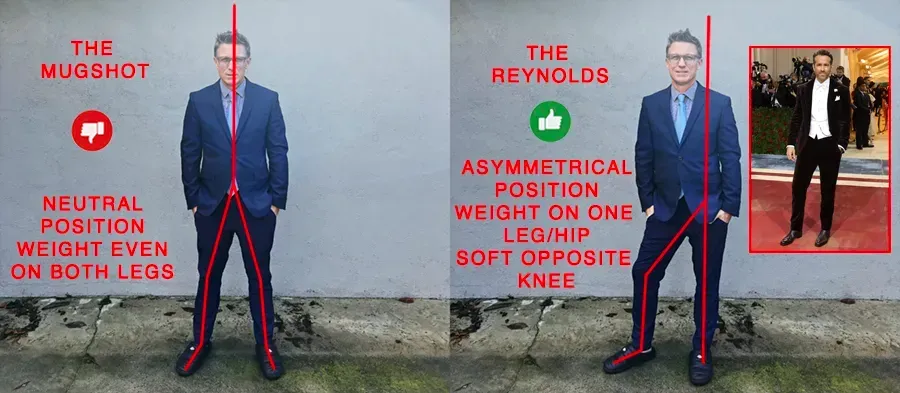
Some people ask me why pose for a headshot, if its only my face in the photo? First everyones definition of headshot is different. Some people interpret headshot literally as a photo of your head while others are expecting a photo from the thighs up. Secondly it's hard to create a great photo of a face when the rest of the body looks awkward or unappealing. As a result every headshot I pose begins with the feet and works its way up to the face. Its like the skyscraper. If the foundation isn't good, your going to have problems up on the 30th floor.
#1 Put Your Weight On One Hip
I called this, technique the Triple R (RRR). Channel your best Ryan Reynolds on the Red carpet. It is the first thing you should do when posing.
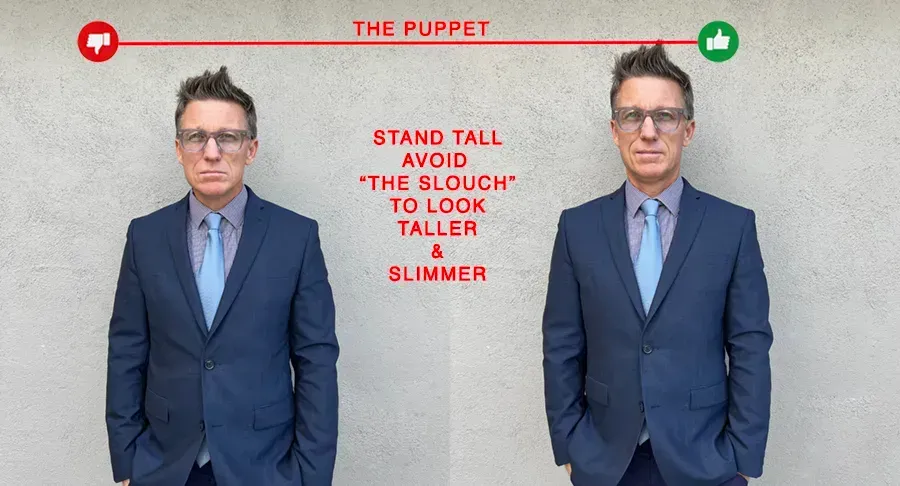
#2 Stand Tall
Most people tend to slump from too much time in a chair. Posture is very important for a good photograph, so make sure you stand up as tall as you can. I called this technique the puppet. You should behave like you're on a puppet string. One way to make sure you stay as tall as possible is to squeeze your abdominal muscles. This will hold the top half of your body up nice and straight.
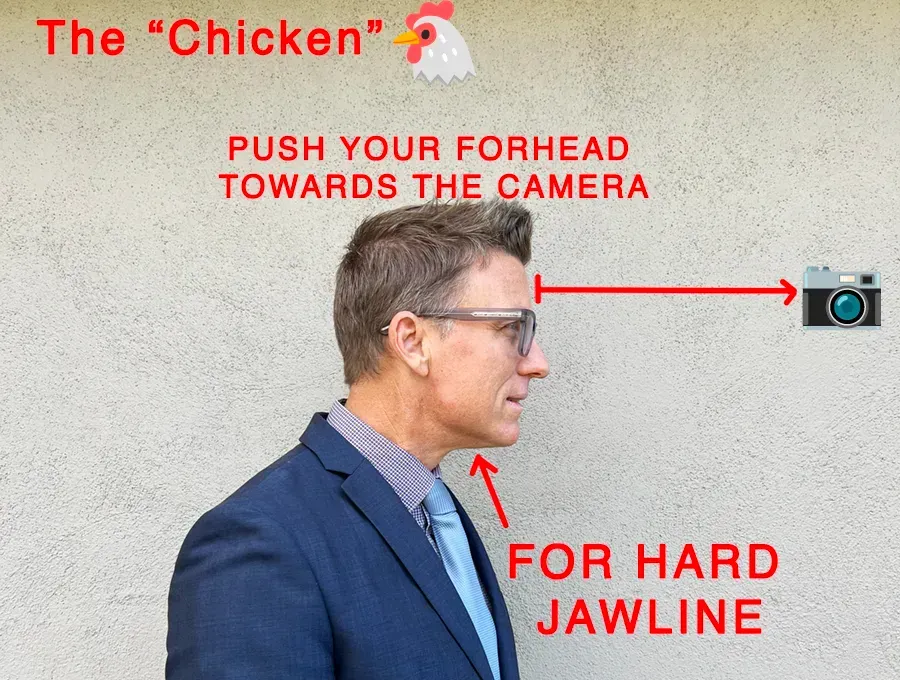
Create A Defined Jawline
The best way to show a nice jawline in a photo is by pushing your face straight out towards the lens of the camera. I called This move "the chicken". It's one of my favorite techniques for Headshot posing.
Once your face is pushed out from your body, lower your chin slightly, so your eyes connect directly with the camera.
Pro tip: Be sure to push your face directly at the camera lens. When you start pushing your face out towards the side, it starts to look strange. Avoid side chickens at all costs.
Pick The Right Outfit
- Wearing the right outfit is very important. It might seem obvious, but be sure to dress professionally.
- Wear an outfit that you would wear for an interview.
- My best advice dress like a boss. What would your boss wear?
- Keep it professional.
- Think about the job you want, not the job you are currently in. Especially if you are looking for something different or a promotion.
- It's also a good idea to dress for the job you want.
Get more professional
tips for men and headshot tips for women.

Headshot Outfit Checklist:
General outfit tips for professional-looking headshots
- Make sure to wear an outfit that fit well
- Dark colors are slimming
- Are free of wrinkles
- Not worn or shabby-looking
- Wear neutral colors
- Long sleeves are better than short
- Avoid logos or writing on clothing
- Large or busy patterns and distracting
- Avoid wearing white
- Keep accessories minimal
- Avoid bright colors and neon colors
Pro tip: Take photos wearing a couple of different outfits. To easily change up a look add or remove a blazer or coat jacket. Change a tie or a blouse. This creates multiple options without having to find entire outfits.
Outfit Tips For Men
Be mindful of your industry norms.
- Use a lint roller on dark jackets
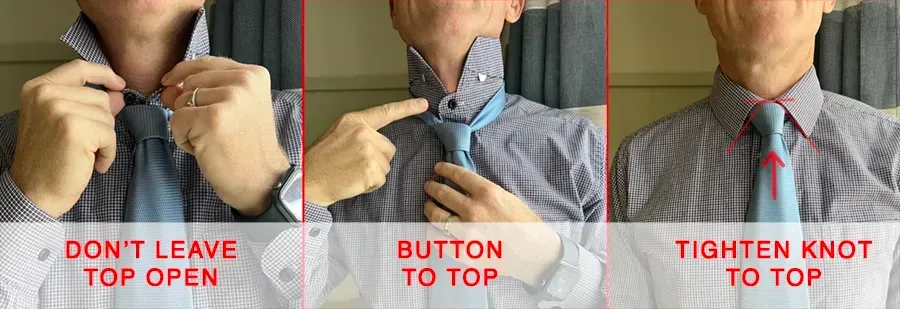
- Button only the top button of a jacket
- Starch your collar and button it
- Wear a tie for men if it is industry standard
- Pay special attention to your neckline
- Keep necktie straight
- Avoid loud busy neckties
- Don't wear an undershirt if it will show through the shirt
- Do not wear T-shirts, sweaters, or polo shirts
Outfit Tips For Women
Consider industry norms when selecting outfits.
- Take photos with jackets buttoned and unbuttoned
- Pay attention to your neckline
- Mind floppy collars
- Avoid low-cut tops/blouses
- Hide bra straps with wide-collar blouses
- Wear colors that complement your skin tone
- Keep accessories, and jewelry minimal
- Be mindful of hair caught in earrings, necklace
- Neutral solid colors are safe to wear in a photo
Step 3. Find The Most Flattering Lighting
Scouting a location inside your home or office is easy as long as you follow a few simple guidelines. In this section I'll provide photo examples from around my own home to illustrate the what to look for and how to avoid lighting mistakes. If your home looks different from mine its important to understand my examples are meant to teach professional lighting principals that once understood can be recognized and implemented in any house, apartment, or office.
How To Find The Best Light Inside
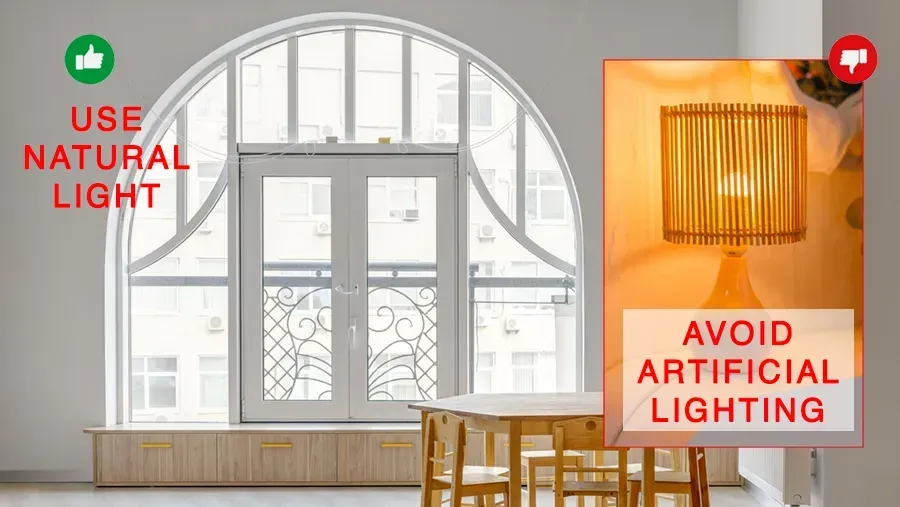
Use natural light. Avoid artificial lighting
It will be a much easier process, and your headshots will look more professional if you stick with natural light only. Natural light is neutral (white) in color, and it is easy to adjust on your computer. Artificial light such as from a light bulb is typically orange and more saturated. Artificial light is usually unflattering on the skin, and difficult to correct in photo retouching.
PRO TIP: The worst thing you can do is blend artificial light and natural light for your headshot. So make sure you use natural light and turn off ALL lights inside before taking photos.
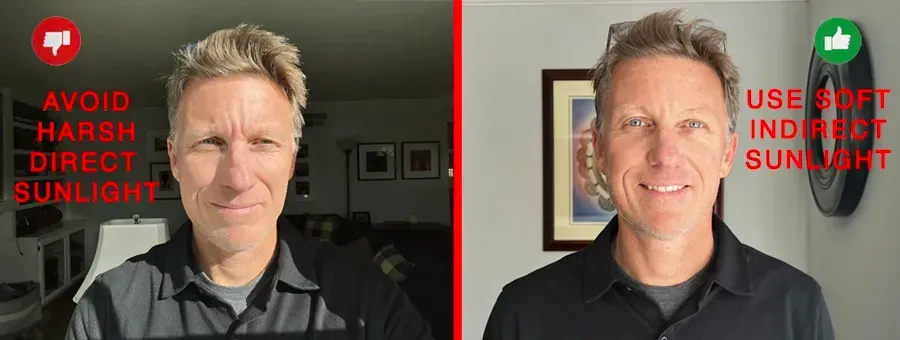
Avoid Direct Light
Lighting on your face should be indirect. Never take headshots in direct light shining on you full stop, period. By direct light I specifically mean light coming straight from the sun.
Indirect light is light that is reflected off a surface. Reflected light is often more flattering because it is usually a larger source of light. Without taking a deep dive into light specularity. The takeaway is to look for spaces with lots of natural light bouncing around such as off white walls in a living room.
Seek Indirect Light
Indirect light is light that is reflected off a surface. Reflected light is often more flattering because it is usually a larger source of light. Without taking a deep dive into light specularity. The takeaway is to look for spaces with lots of natural light bouncing around such as off white walls in a living room. You can find indirect light anywhere in a room with a window except near the window where the sunlight will directly hit you. Simply move away from a window till the direct sun is no longer touching you and you will be in the best lighting zone of the space. The amount of direct sunlight in any room is determined by the time of day, direction of windows and season. I find middle of the day is the best time of day for good indirect light inside.
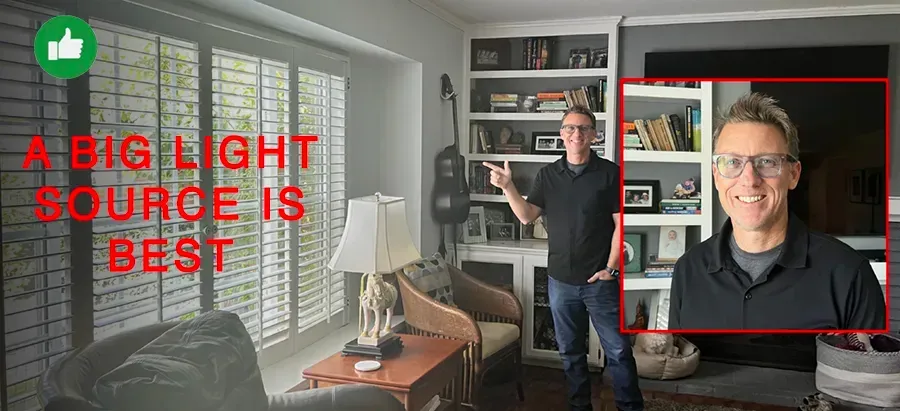
Use A Large Light Source
Bigger light sources are more flattering than small ones. I won't get into the physics of it. But the important thing to understand is the larger the light source you can find the better, and the closer you get to the source the softer and more forgiving the light will be on your face. So find a huge window, doorway, or covered patio where you get a ton of natural light while staying in the shade.
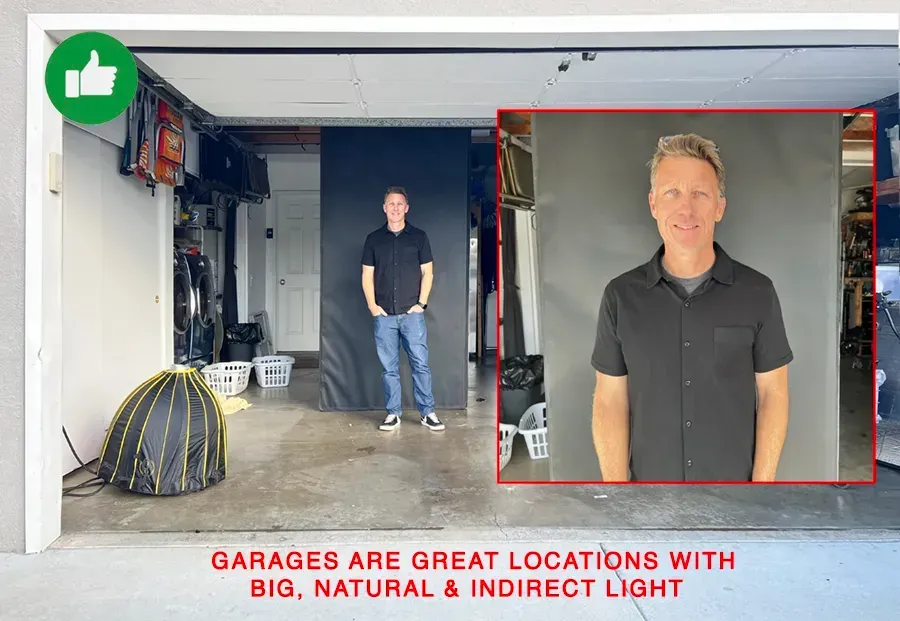
Garages Are Great For Headshots
As a professional photographer garages are an obvious place to find great light in a home. It sounds counterintuative, but there are many reasons I like garages for professional looking headshots. Just open the garage door and you have a huge gorgeous light source that is natural. Most garages have lots of space to adjust to the light. So you can move closer or further to the door and find the best indirect light.
My favorite time of day to shoot in the garage is in the middle of the day when the sun is high in the sky. Between 10am and 2pm the sunlight will bounce off a driveway and fill the space with the most flattering light. Midday also allows you to be photographed close to the opening of the garage door where the light is even better (Closer to the source) instead of early or late in the day when the sun will be lower and puch further into the space, giving you less space to work in.
PRO TIP: If you don't have a garage where you live it's ok. A veranda, covered walkway, or parking structure will work perfectly. The key is that you understand how to find a place with a huge source of natural indirect light, where you can take a picture in the shade facing the light.
Common Indoor Lighting Mistakes
Below are examples of the most common indoor lighting mistakes I see novice photographers make.
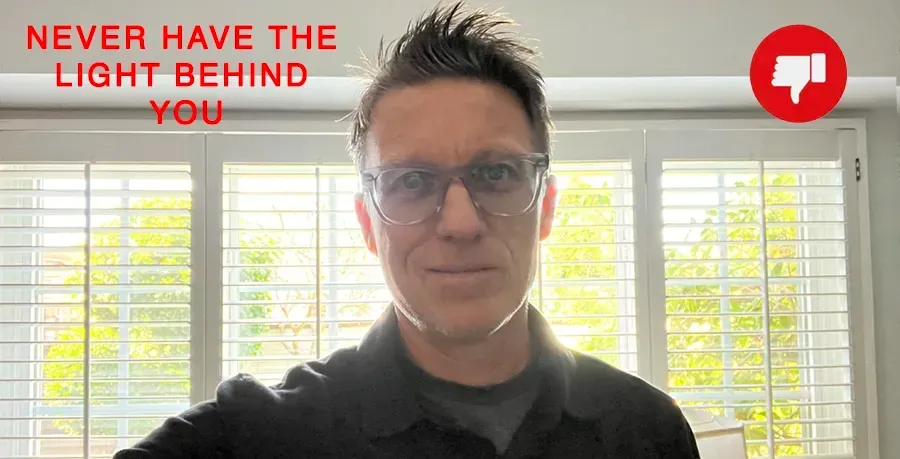
Backlit Photo
The term backlighting means to have the main light coming from behind the subject. (you) Your camera will not know what to do when you put it in an awkward backlit situation, and the result will be a dark face and bright background. Less than ideal. Your smartphone will do one step better and try to correct the mistake. The results will still be less than professional.
PRO TIP: Instead turn the opposite direction towards the light. So the main light in the photo from the window in the example below falls on your face instead of your back.
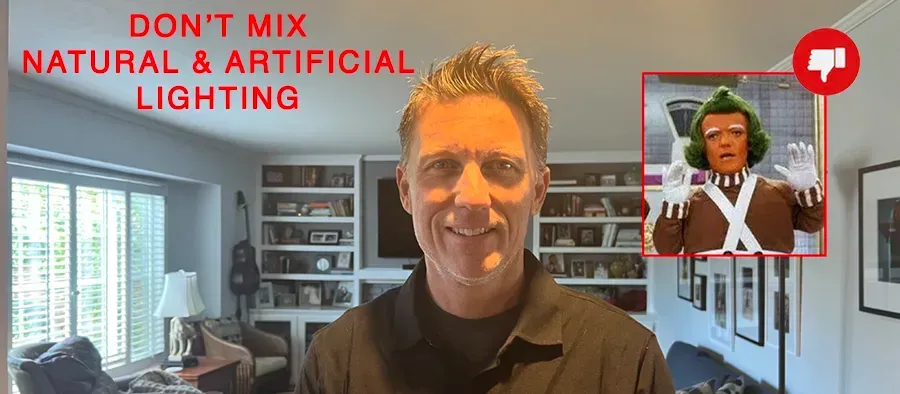
Mixed Lighting
Mixed lighting refers to blending artificial and natural light. Mixed light is a problem because every light has a color. In photography we refer to the color of light as a color temperature. Color temperature is measured in degree Kelvin. I'll stop the photo nerd side of me and just say that most artificiall lighting looks orange. Such as the example below (Umpa Loompa Skin)from a recessed light in the ceiling with a tungsten bulb, or it looks green from a flourescent bulb. Neither will make you look good. When you mix natural light with artificial light the natural light looks blue like you've been dead for a couple hours.
PRO TIP: So Turn off all artificial lights in your space, or better yet choose a location with only natural light for the best results.
How To Find The Best Light Outside
Since light is subject to the laws of physics it's very predictable. Once you understand lighting basics it's easy to apply ideas from an indoor to outdoor situation. This section will assume you have read the previous section on how to find the best light indoors and provide actionable examples for creating great headshots outside.
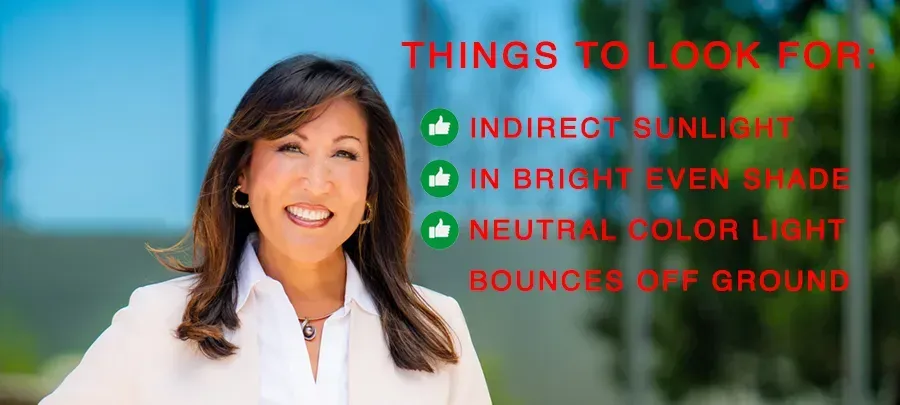
Find Indirect sunlight & avoid direct sun as it will make you squint. Look shiny, and emphasize wrinkles and lines in your skin making you look older.
Look for bright even shade for a flattering appearance. You will find the best light in the shadows nearest to the direct sunlight. In other words, you should stand in the shade closest to the direct sunlight, without letting the direct light touch you.
Find a Neutral colored location. I'm refering to the area around you when you take your pics. Since light reflects off everything in our environments, you are keen to consider what your environment looks like around you. I like neutral-colored environments because they reflect neutral-colored light. Concrete is my favorite because it bounces light upwards off the ground that gorgeously fills in shadows.
Pro tip: When shooting outside I look for huge neutral light sources like White or glass buildings, concrete sidewalks, covered walkways that are near shade. Place yourself in the share near a great light source you will increase your chances of creating amazing photos. See the photo example below that showcases all the ideas listed listed above to create an amazing outdoor headshot.
Outdoor Lighting Pitfalls
Common mistakes and things to look out for when photographing yourself outside.
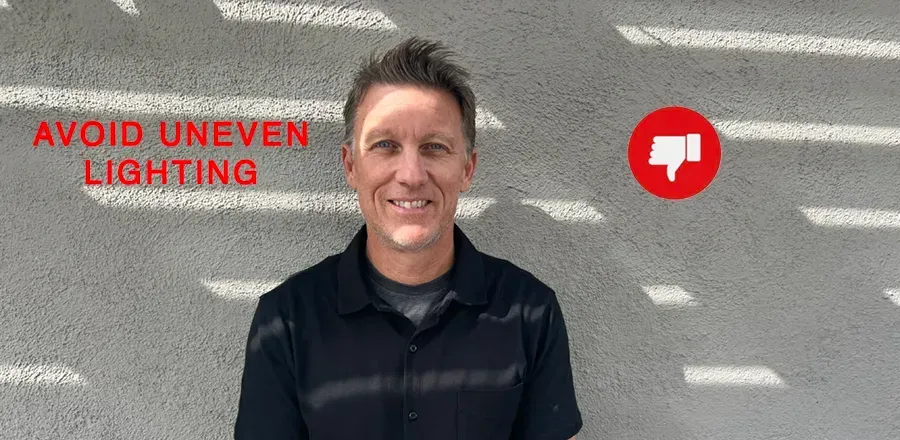
Uneven Or Dappled Light
Photographers often refer to uneven light as dappled when you have sunlight filtering through a tree or plant overhead. Dappled light is fine for an artistic photo, but it's a problem for headshots because it distracts the viewer from your expression and energy.
My advice is to seek even lighting and avoid dappled light when outdoors.
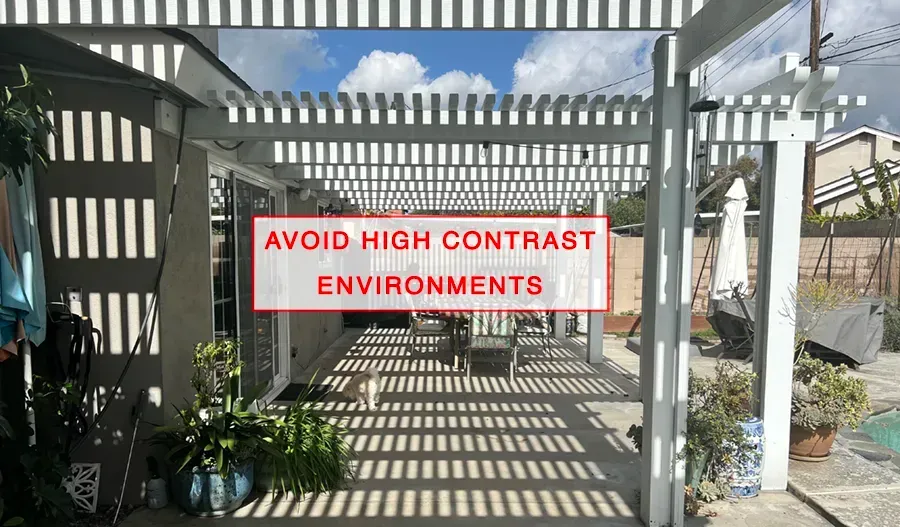
High Contrast Scenes Deep Shadows
Contrast is placing things that are strikingly different next to each other. In terms of lighting for outdoor photos, I'm referring to the tonality of the photo. Human brains are programmed to notice contrast, and for that reason, you might not want unnecessary contrast in your headshot to distract the viewer.
The photo example below from my backyard makes it clear how a scene with high contrast might distract from your headshot.
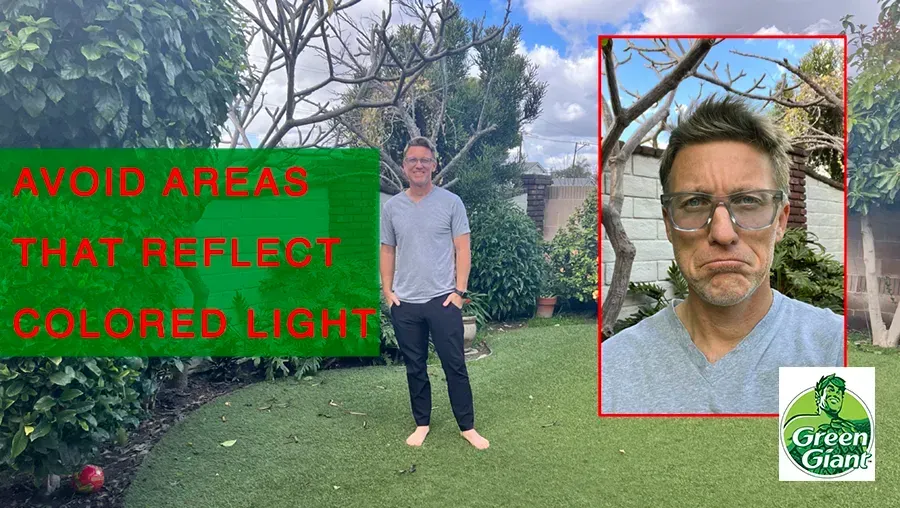
Bad Color
The telltale sign of bad color in a photo is your skin tone. If your skin makes you look overheated, or seasick in a photo, the cause is probably light reflecting off the environment around you.
The most common mistakes are evidenced by an avocado skin color when taking photos on or next to a green lawn. When your skin looks too red you are probably next to a brick building or in the Grand Canyon.
The best solution is to find a location with a neutral-colored (White, Grey) environment.
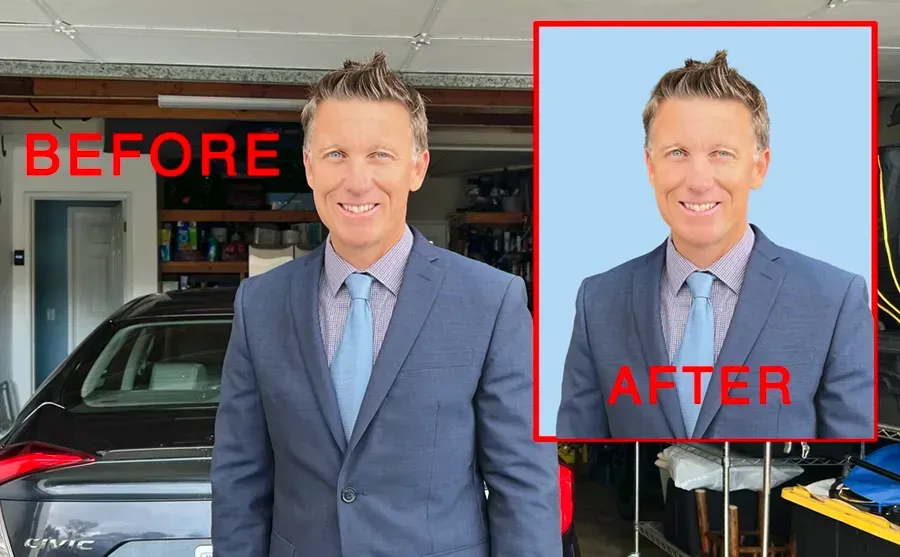
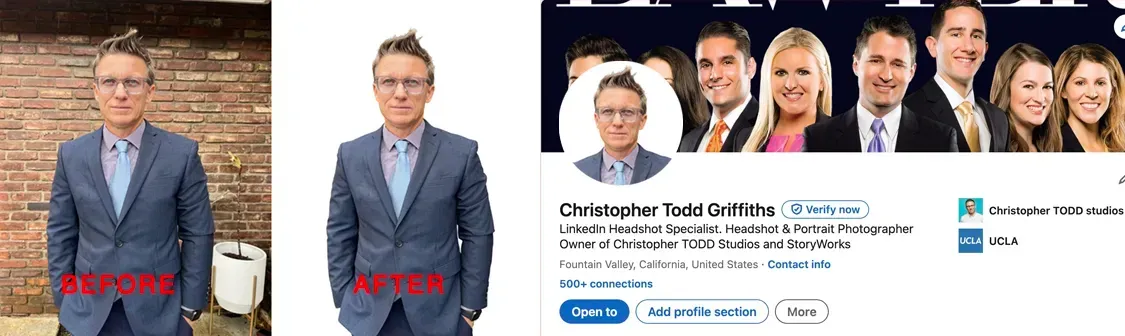
Step 4. Pick The Right Background
You will want to choose your location based on lighting and a simple background.
When considering a background for a DIY headshot it is important to look for a neutral background. A white, grey or beige wall are all good options.
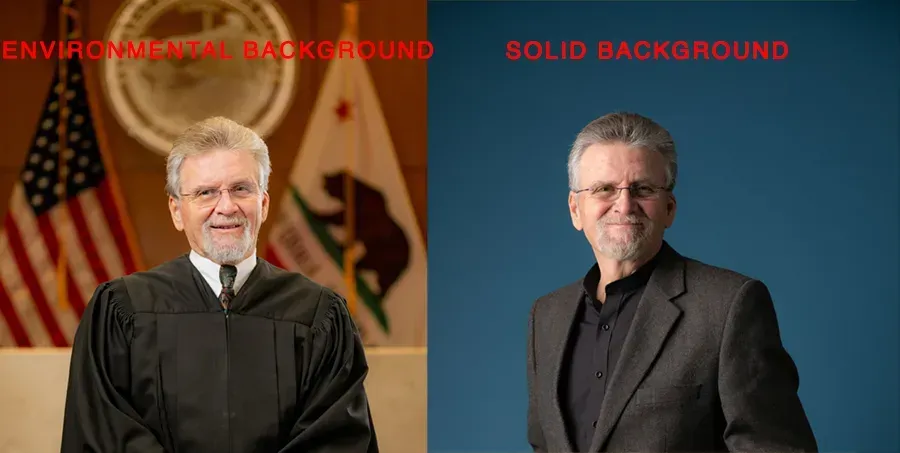
There are two directions you can go with your background
Solid backgrounds are simple. The best example of a solid background is a blank wall. Photos with a solid background are often used as profile pictures on Linkedin.
Environmental Backgrounds incorporate the space around you into your photo. Elements in your environment can give clues or creedence to your status or qualities. An example of this might be a man posing with a Ferrari behind him, or a CEO posing inside a stunning building. The elements in the example imply success or status.
The Easiest Photo Background In Your Home
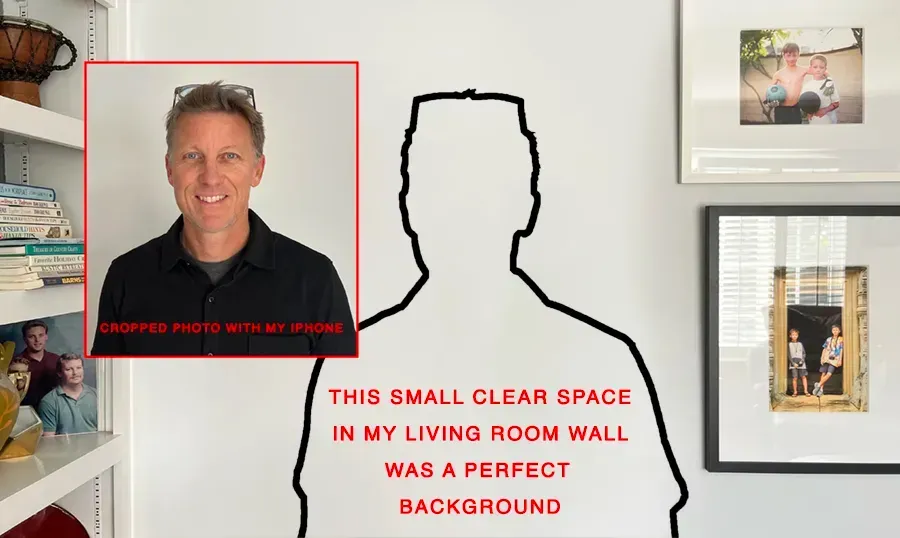
Regardless of your choice of background, it's important to pick a space free of clutter and objects. Think of the background as a plain canvas. Anything behind you like furniture, bookshelves, or photos on the wall will be a distraction and take away from the main focus which is your face.
I recommend finding an indoor location with a blank wall behind you.
This way you can avoid some post-production trying to adjust or remove elements from your background and you will be set up for a quick win with your headshot project.
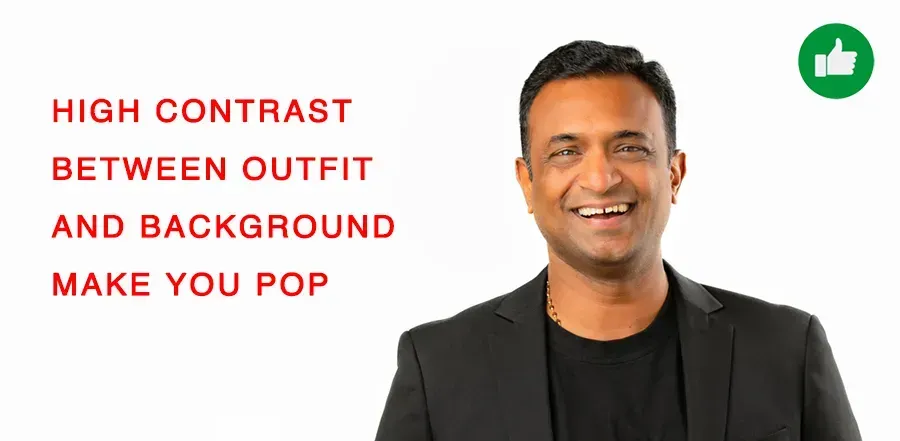
Solid Backgrounds That Pop
My favorite, solid backgrounds for headshots contrast with your outfit or hair color. For example, a dark outfit or hair looks amazing on a white background. It's the stark contrast that creates an image that gets attention.
Scouting a location inside your home or office
Sometimes it can be tricky to find a location with good light and a good background in the same spot.
- Look for a room with a neutral-colored wall opposite a big window
- If the sun is too bright wait for a different time of the day
- Temporarily remove pictures off the wall to create space
- You don't need much wall space for a headshot
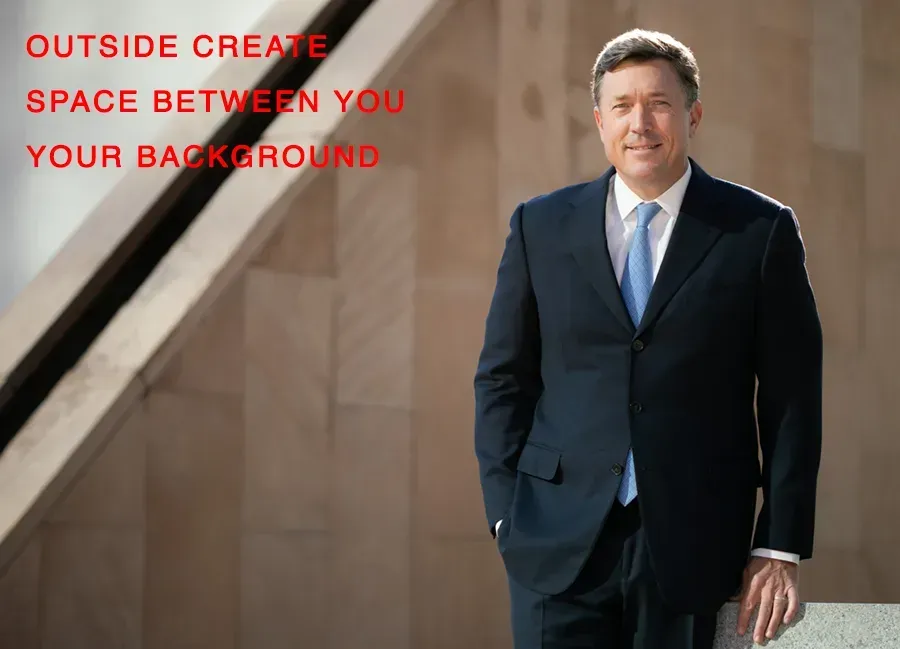
Scouting an outside location:
The same rules apply to outside backgrounds
- The background should be simple and not distracting
- Be sure it is not too bright or dark relative to the light on your face.
- I like to find blank walls on the shady sides of buildings.
Pro tip: Typically you have more space outside. So use the space to have your background further away from you. There is no need to stand right in front of your backdrop outside. Creating space will also have a nice blurring effect, rendering the background less distracting.
Step 5. How To Photograph Yourself
Phone placement is a crucial step. Remember the phone should be between you and the natural light source. For best practice use a tripod. You can get an inexpensive tripod with a remote on Amazon for less than $15. This ensures your photos are taken of you from the same place. It will help to frame yourself in the camera if you don't have anyone helping you.
- Be sure to take more than one photo. This might seem obvious but take multiple photos of the same smile and poses.
- Try to take at least 14-25 photos.
- As you are shooting slightly change your look with bigger smiles, smaller smiles, and partial and full smiles.
- It never hurts to take more photos than you need. This gives you options when choosing and cropping the perfect headshot photo.
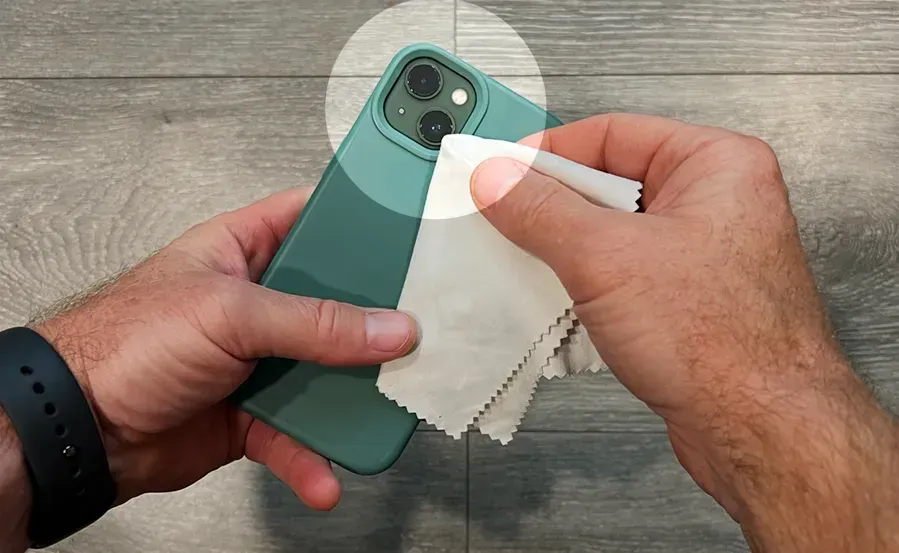
Clean Your Camera Lens
Easy to forget this very important step. I like to use a microfiber cloth to wipe smudges without scratching the lenses on my phone.
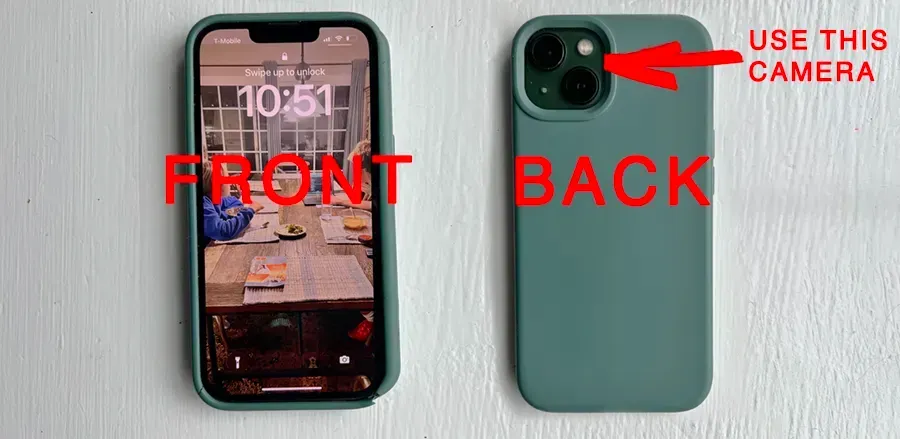
Which Camera Do I Use For The Best Photo
Personally I'm totally confused about which camera on my phone is the front and which is the back so I just wanna make this clear. Use the camera on the backside of your phone. Do not use the camera on the side of your phone with the screen.
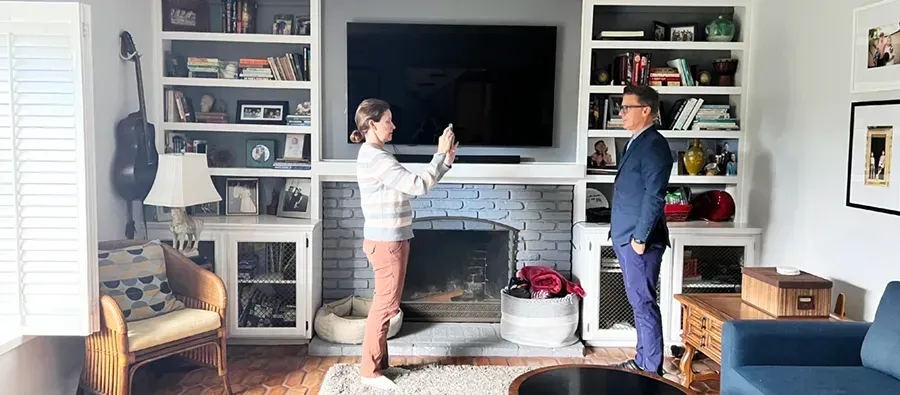
Ask a Friend, Spouse, Coworker, or Neighbor To Help
The easiest way to get photos is to recruit someone for help. Choose a person you are comfortable in front of and know will be supportive and encouraging. Some benefits of getting a friend, spouse, or coworker to take your photos:
- They can help you smile
- Get you to laugh
- Let you know if you are standing in the right part of the frame
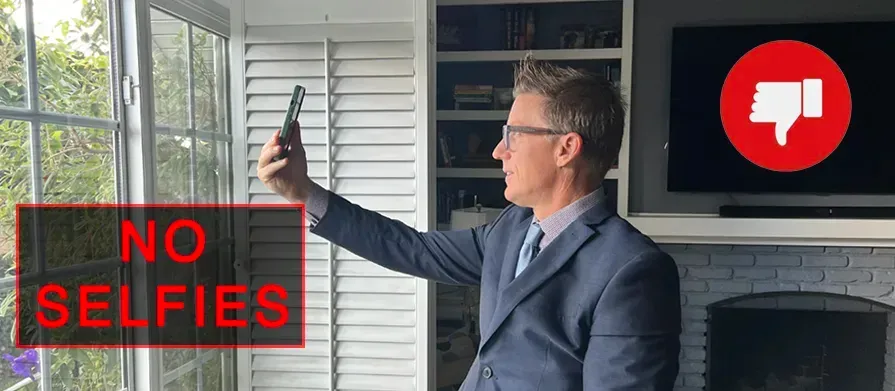
Pro tip: Don't Have A Friend? Invest in an inexpensive tripod. Whatever you decide, do not take selfies of yourself for your headshot. They distort your features aren't that flattering. If your determined to take photos on your own.
- Stay away from selfies at all costs
- Get familiar with the self-timer feature on your phone
- Use a tripod and remote trigger
- Find a bookshelf to put your camera on
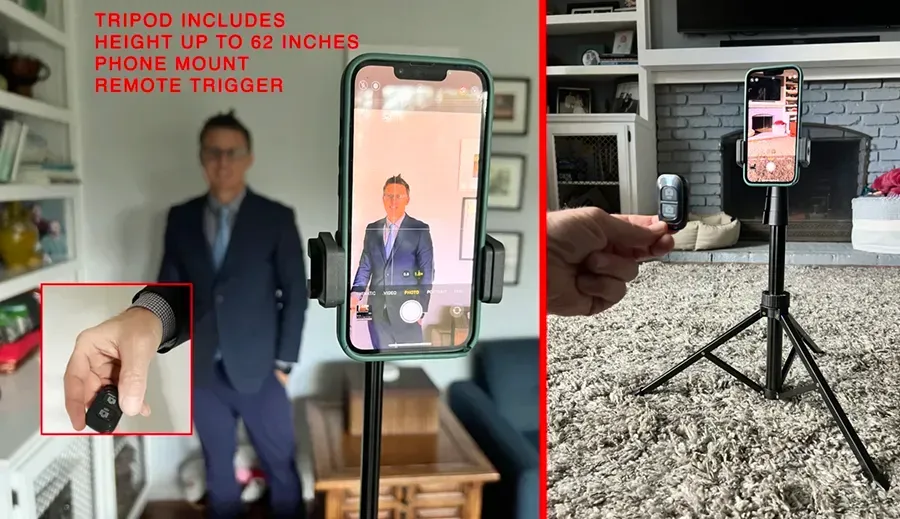
Use A Tripod For Easy DIY Headshots
Using a tripod and a remote trigger is the easiest way to photograph yourself for a headshot. Make sure your tripod has...
Pro tip: If you're working alone buy a tripod and remote package. Using a remote makes the process so much easier.
I purchased my tripod on Amazon. It has all the features you need.
How To Setup Your Tripod For DIY Headshots
Using a tripod and a remote trigger is the easiest way to photograph yourself for a headshot. Make sure your tripod has...
No Selfies
The most common mistake people make is shooting a selfie. You will not be able to hold the camera far enough away from you doing a selfie unless your built like Wilt Chamberlain.
Pro tip: Nobody around to photograph you. No budget for a tripod. Then it's time for some bookshelf ingenuity. Most bookshelf's are tall enough to place a phone about eye level for your headshot. Pretend a bookshelf is your tripod and move it where you want your camera to be positioned.
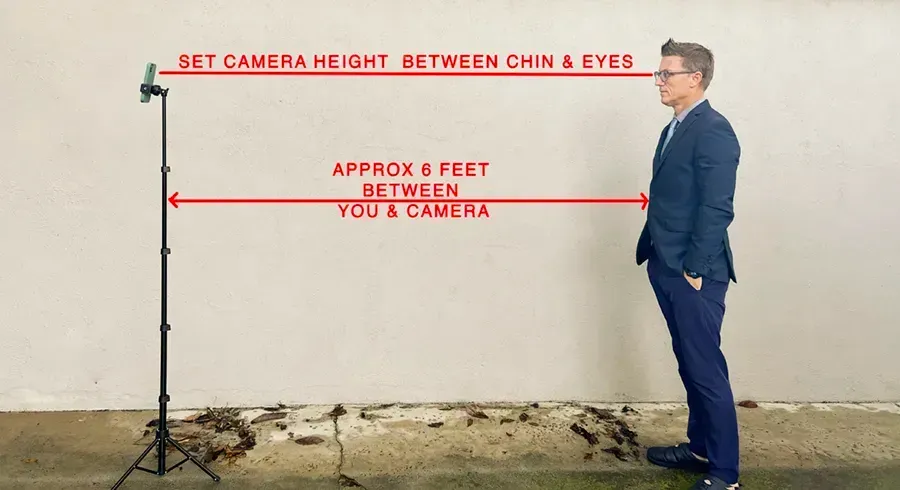
Camera Position Distance And Angle
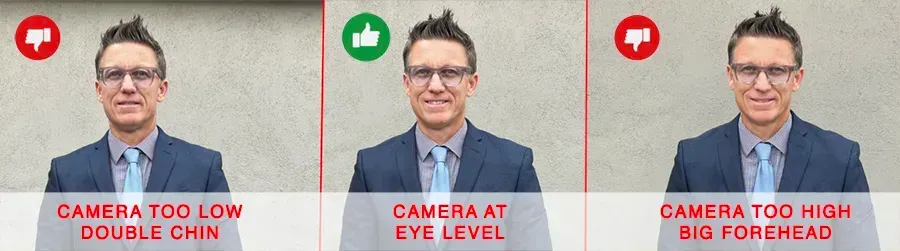
In photography school, I was taught that the camera should be even with the subject's chin. However, I prefer to have the camera a little bit higher between the nose and the eyes. It's fascinating how small changes in camera placement can make you look very different.
Low camera angles are associated with masculinity. They can make you look powerful or imply leadership. Which is great, however, a low-key camera will also emphasize a soft jawline. So if you don't have a movie star jaw. then you will look more appealing by raising the camera a little.
Higher camera angles are associated with femininity. They can make you look weak, or indecisive. They also emphasize your forehead. So if your forehead is bigger than you like, you should lower the camera.
Framing Or Composing A DIY Headshot
- Leave a couple of inches of space above your head. This is important because you want to be able to crop the photo as needed
- Take some photos from the waist up
- Take some photos from the shoulders up
- Avoid using the zoom function on your phone
- Instead, walk closer or farther away from the camera
- Be sure to look straight into the camera
- Position the camera so it is at eye level. Not looking up or down on your face. This helps with eye contact.
Pro Tip: Place a piece of tape on the ground for a marker to stand so you are always in the same spot. For a faster result recruit help for framing the subject in the camera phone. A good headshot will have enough space above the head and be taken from the shoulders up. Both shoulders should be in the frame with space on the sides.

Step 6. Picking The Best Photos
After you have taken your photos be sure to review them and make sure the image quality is good. Use this checklist below to make sure your headshots professional-looking:
- Photos are in focus
- Both your shoulders are showing in the photo frame
- Headshot photos are taken from the waste-up
- There is enough space above your head and on the sides of your shoulder for cropping
- Pay attention to the small details in the photo. Proper smile, eyes looking into the camera
- Hair is nice and tidy
- The outfit looks sharp and wrinkle-free
- If wearing glasses make sure there is minimal glare and glasses are free of smudges
- Check the flattering angles and poses
- Is the lighting on your face even and smooth? You are looking for any shadows that appear on your face.
- Is your photo taken from the right height? Remember camera should be level with your eyes and forehead.
- Do you like the overall look of your business headshot?
Pro Tip: Have a friend help you choose. Sometimes other people see us very differently than we see ourselves. Get a second set of eyes on your photos to help you decide. Remember to take at least 30 photos so you have enough to choose from.
Step 7. Simple Editing Tips To Enhance Your Headshot Photo
Enhance your professional-looking photos like a pro. Now that you know how to take at-home headshots with a phone camera, dive a little deeper and learn a few simple editing practices and what they mean. Start by choosing a photo editing app or simply use the iPhone photo editor or Google Photos editor.
Note: Apple editing automatic wand makes photos immediately nicer but might not be enough to look professional.
Here are some editing tips:
- Skip the filters keep it natural and professional
- Exposure: Makes photo brighter or darker. I like to have the face a little brighter than the background.
- Brilliance: Brilliance can make photos appear more vibrant and visually appealing. It can brighten dark areas, pull in highlights, and add contrast to reveal hidden detail. Brilliance can also help preserve the detail and color in the mid-tones.
- Contrast: Makes the whites whiter and brighter and the darks darker. Adding a little contrast makes the image have a little more sharpness and definition.
- Black point: Sets the point at which the darkest parts of the image become completely black without any detail. Setting the black point can improve the contrast in a washed-out image.
- Vibrance: Makes the colors more vibrant. I like to increase the vibrance, but not too much or you will start looking cartoonish.
- Warmth: Makes the image warmer or cooler tone. Depending on the light you photograph yourself in you will want the skin to have more yellow tones than blue. But be careful not to look too jaundiced.
FAQs
How do I make my headshot look professional?
How to take a professional headshot with your phone by yourself?
Invest in a smartphone tripod. Find the right background. Practice posing and smiling in the mirror. Use a simple camera remote or get familiar with the self-timer on the phone.
Take multiple photos so you have plenty to choose from.
What Should I Wear in a Professional Headshot?
What Should I Wear in a Professional Headshot?
Dress in a professional work attire outfit. Think about what your boss would wear or the position you aim to get.
Make sure to wear outfits that fit well,
Are free of wrinkles.
and are not worn or shabby-looking.
Wear neutral colored shirts
Wear a tie for men if an industry standard
What color is best to wear for headshots?
What color is best to wear for headshots?
Neutral colors shirts
Dark color coats
Avoid loud bright colors or busy patterns
choose colors that are opposite to the background
Should I smile in my headshot?
Should I smile in my headshot?
The short answer is Yes!
Yes, you want to smile in a headshot. This shows that you are kind, friendly, and approachable. It is important to be welcoming in your photo. Headshots where people are smiling get more views.
What does a good headshot look like?
What does a good headshot look like?
You are well-cropped, smiling, dressed professionally, and staring into the camera. Your pose is confident and approachable.
- The top characteristics of a great headshot are:
- Smiling. Be sure to smile and show your teeth. Practice smiling in a mirror. Add a fake laugh and see how the smile reaches your eyes. This type of smile will appear to be genuine. A smile is important to have in a headshot, to show you are friendly, approachable, and trustworthy.
- Framing/cropping is important in a headshot. So pay attention to where you are in the image. Leave space on both sides of you including above your head. This will allow you to crop the image later.
- What you wear is very important for your headshot. You should always dress professionally. Think about your industry and a typical expectation for appropriate dress. Be sure your clothes are properly pressed and wrinkle-free.
What makes a bad headshot?
What makes a bad headshot
Many things contribute to a bad headshot. Here are some:
The photo is blurry, your clothes are wrinkled or unprofessional looking. The lighting is poor quality, you have shadows on your face. You are cropped poorly, The background is too busy or cluttered, you are wearing formal attire, and there is more than one person in your photo. You are using a selfie or a really old photo that doesn't look like you anymore.
How do you smile for a headshot?
How do you smile for a headshot
A genuine smile will have these qualities:
Your teeth will show
You are smiling up to your eyes
You are smiling with your eyes slightly squinched
Your smile isn't forced or fake-looking
What is the best lighting for headshots at home?
What is the best lighting for headshots at home?
The best lighting to use for DIY headshots is natural indirect lighting. This means, finding a location inside near a big window. The bigger the source of light the better you will look. Be sure to face the window so the light is hitting your face. The light should be indirect sunlight, not full bright sunlight. This is the most flattering light and will make your skin look the best. Avoid using over-the-head lighting, or other artificial lighting as this will create harsh shadows on your face.
If you have to take photos outside, be sure to find a fully shaded area. Stand near the edge of the open shade facing the light. Avoid uneven or partially shaded areas. In addition, avoid direct sunlight as this is too harsh and not flattering.
Can I use a selfie as a headshot?
Can I use a selfie as a headshot?
The consensus among professional photographers is we strongly recommend not to use a selfie as a headshot. There are many reasons to avoid this. The first is a selfie camera uses a close-up lens that can make you look distorted. It is hard to frame yourself properly with a selfie. There are no attributes of a selfie looking like a professional headshot.
What should you avoid in a professional headshot?
What should you avoid in a professional headshot
Things to avoid:
Big Jewelry
Loud patterns or bright colors.
Logos
Overly dressy clothes, like formal attire. No ballgowns, or tuxedos.
Women should keep the neckline in mind. Too low can be distracting
Avoid sleeveless shirts
Sweaters
These elements are important to your headshot so they look professional and have minimal distractions.

Meet Christopher Todd: Your Orange County Photographer
Hi, I’m Christopher Todd! I launched
Christopher Todd Studios back in 2000, but my love for photography started long before that.
Born and raised in Orange County, I’ve spent my life exploring this beautiful area. From surfing in Huntington Beach to discovering the best photo spots across the OC. Over the past
25 years as a professional photographer, I’ve continued to learn, grow, and refine my craft.